Showing posts with label holiday. Show all posts

Monday, January 3, 2011

Christmas gifts for my kitchen...

For Christmas this year I received a beautiful gift (one of the beauties below) and then I purchased my kitchen a gift, or two (yes - the rest of the beauties below). In fact, I will openly admit that I love to buy gifts, for myself.

When my hero-of-a-hubby asked me what I wanted for Christmas I couldn't think of anything except for kitchen stuff. I wonder if Gloria Steinem (or any of the NOW leaders from the '70s would be disappointed at this wish list.) All I could think about was how upset some ladies used to get when they received a blender (or other small appliance) as a gift. But I digress... and now I'm thinking of a writing new blog post!

Anyway, I had my eye on most of these items for months... researched, and saved up my "allowance" to buy each one in the months leading up to Christmas. While I had already been using them I still wrapped their empty boxes and placed them under the tree! My hubby just laughed... "Another gift from 'Santa', huh?!" (and yes, he made the quotation marks with his fingers...sigh!)


The first perfect fit I found was this Lodge Logic cast iron 5" skillet (pre-seasoned)... perfect for frying eggs, toasting spices and so many other things!!! Love, love, love... (the image below looks much larger than 5"... but 5" it is.) (Approximately $15 at Walmart.)


I also found a Lodge Logic cast iron chicken fryer (also pre-seasoned), with lid... in this you can also make cinnnamon rolls, chili, cornbread, and so much more... (Approximately $25 at Walmart.)My hero-of-a-hubby bought me this early Christmas present: Kitty - the KitchenAid stand mixer. (Yes, I've finally named her!) This is something I have told him for years I wasn't ready for you. You see... it's a bad problem to have. I only have about 4 feet of counter space in our tiny/nearly antique kitchen. And I wasn't sure I wanted to dedicate 1 of those feet to a mixer. This year I finally decided it was time. (Bought it at a great discount on Amazon.com several days before Thanksgiving... and the day after Thanksgiving it was only selling for $10 cheaper. I had it by then and couldn't have been happier.)

We had the money set aside for it... so we took the plunge. It's definitely an investment of both money and time... there's more cleaning involved (I mean, ones DOES want to shine it up after every use - unlike the little handheld beater I've been using for over a decade), if you're really into it you want to buy some of the accessories and additional attachments so you can grind meat, make your own pasta, etc... I'm not there yet. But I have a feeling I might want the pasta attachment at some point in the near future.

Um... and because I now had a stand mixer and could make some good doughs, then I also bought myself a Pie cutting board ... but my hero-of-a-hubby still thinks that was from Santa. (Shhh!) (Approximately $28 at Walmart.)

And lastly I stumbled across these Matryoshka dolls (Russian nesting dolls) that also serve as measuring vessels. And when I think of nesting dolls I think of my childhood... and I feel happy. So I bought them.

Aren't they adorable?!


Like I said, aren't they adorable?! I'm going to put them out on the cupboard and see how long it takes my husband to ask when the babushka's arrived... anyone want to place any bets? (These beauties were purchased at World Market, approximately $13.)


But lastly let me introduce you to a true gift... from an actual friend (not from "Santa"). A dear friend gifted me this adorable little porcelain birdy perched over the most perfect little porcelain bowl with the tinniest of porcelain spoons... from Anthropologie!!! (< -- love that place!)


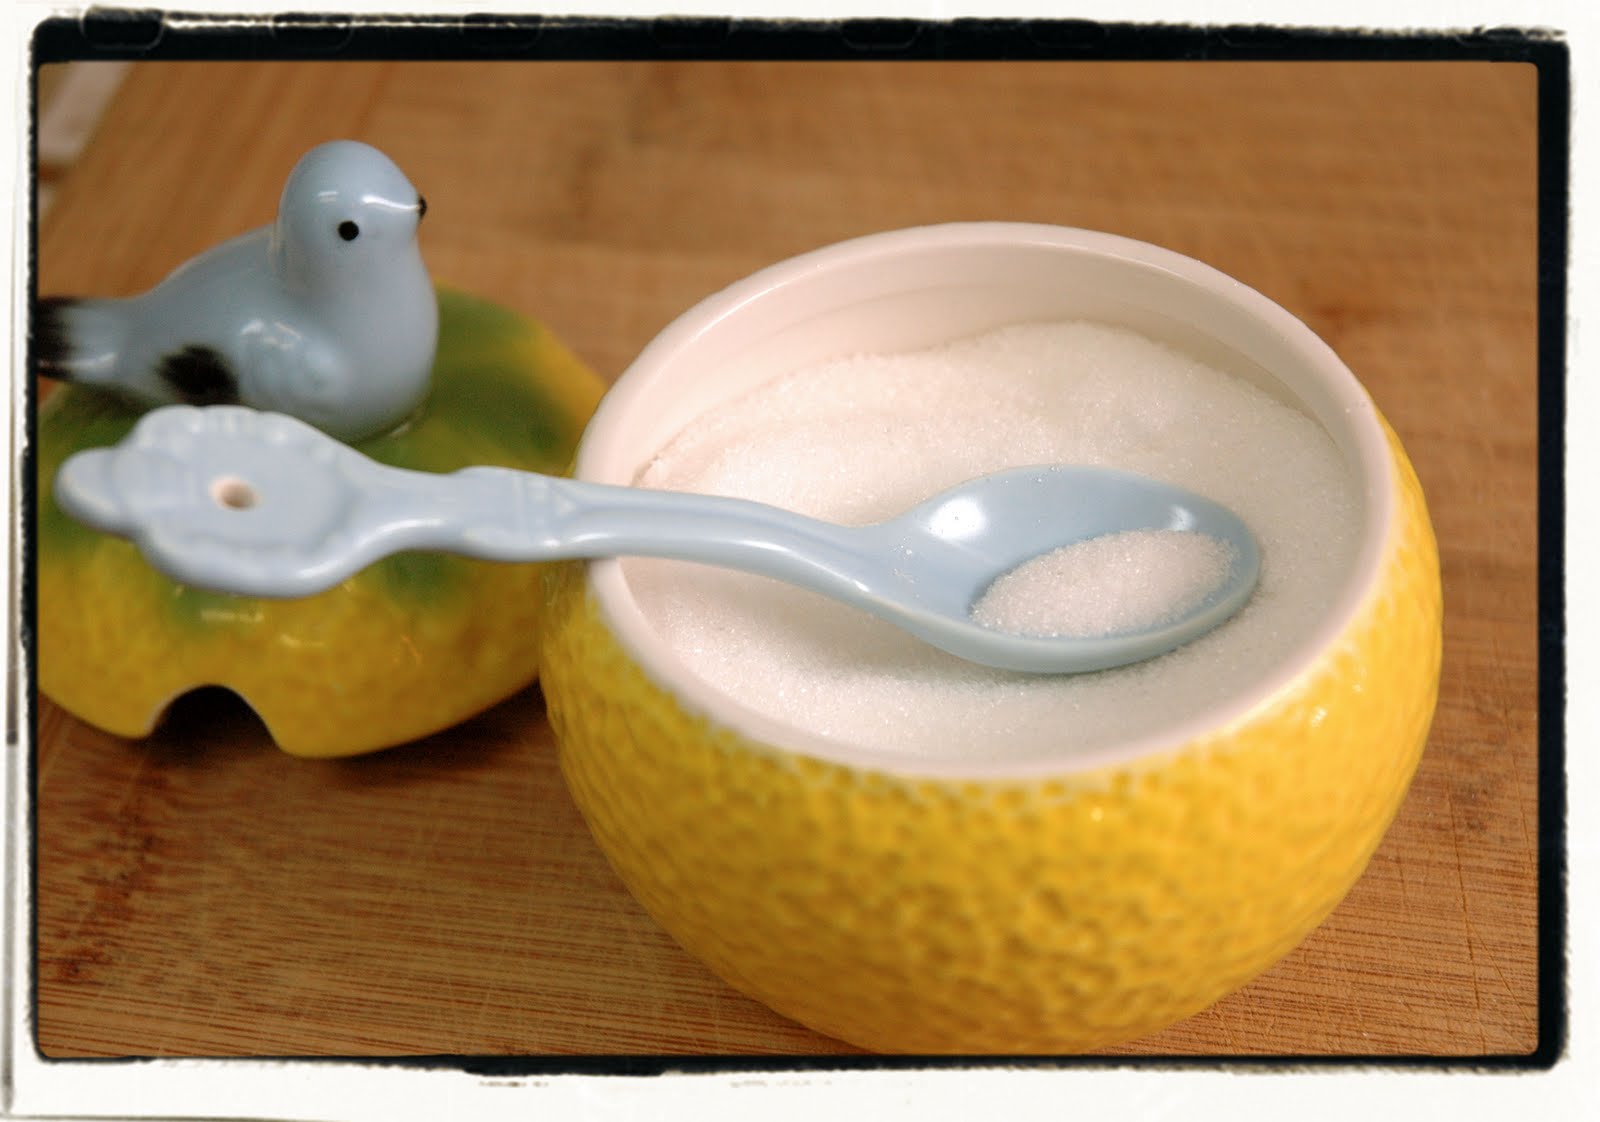
This truly is adorable!

But I'm afraid to use it... 'cuz I'm notorious for dropping and breaking things. So, if you never see it in my kitchen again it's either because I entered it into witness protection program (for it's own good) or I have already smashed it to smithereens.


Love the porcelain birdy Mariam! Thank you for thinking of me and trusting me with this beauty...


enjoy your time in the kitchen...

Sunday, December 26, 2010

A new kitchen toy ...


Paula Deen ... I already loved you. But now I love you more!!!

Thank you for making this nice board available at a very good price (under $30)! In my small kitchen I did not have a large enough flat surface to work with... and this is the perfect remedy to that problem.

This is an 18" x 20" x 3/4" board made of acacia. On one side is a visual guide for rolling out pie crusts... as well as a helpful guide for dry and wet measurements.


Take a gander... click on the picture below to enlarge it.


And the opposite side is even more beautiful! I can see myself using this as a cheese/fruit board when entertaining... this will help to make a very nice presentation!


Love it! And when I pulled it out from behind the tree and unwrapped it my hero-of-a-hubby asked who it was from. I simply said "Well, it's from Santa... of course!"


He knew better than to ask anymore questions...


enjoy your time in the kitchen...


Saturday, December 25, 2010

Pork Roast with Mushroom Gravy... recipe from America's Test Kitchen


This is a yummy pork, roasted low and slow. It's encrusted with dried herbs and cooked with some aromatics. Then topped with THE most velvety-rich mushroom gravy you ever did have.

I would like to thank America's Test Kitchen for sharing this recipe... thank you for making our lives just a little bit better by testing this recipe and then sharing it with the rest of us.


Today I used a pork leg... once the roast is done the bone slides out nice and easy. For flavor the roast got encrusted with a dry rub of dried thyme and sage and kosher salt and black pepper.


I tied it up nice and tight... and cooked it in a 300 degree F oven for about 3 hours.


After 3 hours of cooking it was time to add more flavor. So I added sliced crimini mushrooms, quartered onion pieces, some bay leaves and chicken stock/water mixture (about 1 cup of each)... oh yeah, and some more of the dry rub seasoning.


Once a fork inserted into the largest meaty part of the roast inserts and comes out easily... then it's just about ready. Take the roast out, transfer to another platter, cover with foil and set aside. It needs to rest for about a half hour and then it can be sliced.


In the meantime discard the onions and bay leaves and through a fine mesh strainer strain the juices, setting aside the mushrooms. From the strained juices, use a few tablespoons of fat to start the gravy with a couple tablespoons of flour. Then slowly add the rest of juices and whisk until nice and velvety. Add the mushrooms back to the pan and reduce the heat until you're ready to use it. Before ladeling over your meat and fixings taste to see if needs any more salt/pepper.


Now it should be time to slice the roast and plate your fabulous dinner.


Be prepared to be kissed... or better. It's that good... again, a big thank you to America's Test Kitchen! Love ya for it! Really, I do!


enjoy your time in the kitchen...


Saturday, December 18, 2010

Batch #14

It's the week before Christmas... I'm busy in the kitchen working on batch #14 (or is it #15 now?!) of the Nutty Toffee.


I'm getting ready to crack this one apart and start another batch...

I wish I had another jelly roll pan this size... I could make 2 batches at once. Hmm... is it too late to add something to my Christmas wish list?


enjoy your time in the kitchen...

Sunday, December 5, 2010

I made my own marshmallows today!!!


In a previous post I shared the embarrassment that happened in my kitchen today: Martha Stewart is laughing at me. <--- click here to read more!

Well, here are pictures of the final stages of that adventure... and they turned out alright! They even taste good!


Take note - making marshmallows is a very messy process. But rather rewarding...


In the previous post you'll see how they were made. I had to take a break and walk away from the mess that overcame my kitchen. So, now that I'm ready to tackle the rest of thsi project... this is the final product post.


My tip would be to slide the knife through a cloth/paper towel that has some canola oil on it before cutting. And then you'll find the need to clean the knife off every now and then to re-oil it. This will help prevent the marshmallow from sticking to the knife too badly.


I cut them into one-inch squares... aren't they cute?!


And then I wrapped them up to go...


They are going with me to the office tomorrow... and will be handed out to the highest bidder.


Thanks for the challenge Martha... I was up for it. Whatcha got for me next?!


enjoy your time in the kitchen...

RECIPE: Rock Candy Shards


As a kid, I remember making red anise flavored candy in my mom's kitchen... her instructing me... me following her directions.

This is another one of those recipes she learned in her 7th grade "home ec" class... and she handed it off to me. But it's been over 20 years since she and I have made this together. So, in light of celebrating old traditions this time of year I figured I would try my hand at it again...

Here's where I started...


I chose to use anise flavoring (tastes like black licorice)... but you do any flavor you prefer. For instance, I colored this red... but if you chose to do mint you could color it green. See where I'm going with this?

But first things first.... let's prep the tray this is going on once it's done.


So, we're going to need the candy thermometer again... ready? Over medium-high heat bring the sugar mixture to a boil and allow it to keep boiling gently until it reaches the hard crack stage (300-310 degrees F). This takes 10-15 minutes... keep stirring.


Take the pan off the heat and add your flavoring...


Then the food coloring gets added... add about 8-15 drops. (I wish I would have used a bit more for this batch.)


Making quick work, pour the micture onto the jelly roll pan and allow to cool completely.


Once it has cooled completely (a few hours) you can turn the pan over onto a kitchen towel and break the shards apart with a kitchen knife.


As a kid, I remember THIS being my favorite part...


As an adult, enjoying the rock candy is my favorite part.


Rock Candy Shards
Recipe courtesy Janie Haraldsen

Ingredients
2 tablespoon butter, softened
¾ cup water
2/3 cup light corn syrup
2 cups granulated sugar
1 teaspoon flavoring extract (I used anise/black licorice)


Red food coloring

Instructions
With butter, lightly coat a jelly roll pan - set aside. In a heavy saucepan, with a candy thermometer inserted, combine water, corn syrup & sugar. Bring to a boil over medium-high heat - stirring continually, dissolving all sugar crystals. Stir the whole time until the thermometer reaches the hard crack stage - 300 degrees F.

Remove from heat, stand back & carefully stir in anise extract & few drops of red food coloring (it WILL sizzle). Pour into prepared pan & let cool completely.

Lay out clean dish towel, turning out hardened candy on it. Wrap up gently and crack with the big end ofa butter knife. Store in a cool, dry container.


enjoy your time in the kitchen...

LinkWithin

Related Posts with Thumbnails