Sunday, April 25, 2010

RECIPE: Lemon Deluxe Bars


I've been making these lemon bars since my mom taught me about them quite the long time ago... she learned this recipe in her home economics class back in the day.

Since then I've made lemon bars for friends, for co-workers, for complete strangers... they've been served up at house warming parties, baby showers, retirements parties, wedding receptions, church potlucks...

Well, the list could go on...


And I don't like to brag.... but because many have asked, here it is...

It's a two step process. We prepare/bake the crust first. And then move on to the lemon layer.

So, first we measure out the flour...


Dump the appropriate amount into a large bowl and measure out the confectioner's sugar... and mix well with a fork. (The instructions say to sift these together - I don't like sifters. I'm kind of a rebel that way.)


Next we add a couple sticks of butter to the party. This is room temperatue. Personally, I like to cut them into smaller sizes... it just works better that way when you add them to the dry mix.


One stick at a time... and mash the butter together w/ the dry mix using the back of your fork. It'll still be rather dry... so don't worry about it too much. And just add that other stick of butter.


Mash and repeat...


If it still looks rather dry, you may need to jump in and get a little dirty.


The warmth from your hands will melt the butter a bit more and bring it all together. Mix the dry ingredients and butter until it starts to clump up in your hands. Once it is of the consistently that you can press it into a casserole pan... well, that's what you want to do.


So find that casserole pan, dump in the dough and and start pressing.
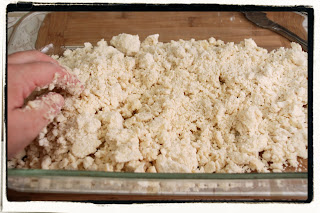


I use my fingertips at first...


But it still looks rather lumpy...


So then I use the back of a large spoon to convince it to "STAY!"

At this point, the casserole goes into the oven for 20-25 minutes. Or just until the edges of the dough start to brown a bit. You don't want it too dark... just a bit.


Then I walk away from the kitchen and do something else. And it's the smell of the dough cooking that lures me back in to check on it... you know the smell of hot butter, right?! Wow...


About 10 min before that layer is done... I work on the wet mix for the lemon layer.


What am I doing? Well, I'm beating eggs, of course...


(Pardon me - I'm laughing to myself at the moment. When I was in high school there was this christian drama team that performed at church summer camps and youth events. And a quick search of Google tells me they are still around... they are called the Delivery Boys. And back in my day they had this routine called "Beating Eggs". I couldn't do it justice trying to explain it here... you just have to see it in person. And you would know why tears roll down your face when they did the routine... yes, it was just that good!)

Anyhow, back to my kitchen...

Add the sugar... and the lemon juice...


And keep beating those eggs...


After adding a little more flour and some baking powder... mix well... and we're almost done...


First we have some little lumps to get rid of (if only I had used the sifter ... next time!)


I mash the little flour bubbles up against the side of the bowl, whisk it into submission some more... and ...

THAT looks just about good enough...


Right about the time I'm finished with the lemon layer, the timer goes off for the crust layer. And here it is...


Pour the lemon layer of the crust and put it all back in the oven...


Approximately 20-25 minutes later this is what you have...


Get out the confectioner's sugar again and get to shakin'...


Add as much or as little as you want on top ... but the key is to sprinkle on the confectioner's sugar while it's still hot.


Isn't she pretty?!


Allow to cool for a few hours before you cut into it... but once you do, make sure to dish yourself up at least two pieces...


Now, enjoy one small bite at a time...


Shhh... do not disturb...


Just one more bite...


Well, they ARE small bites...


Is YOUR mouth watering yet?!


Oh!!! Wait a minute! Who ate all my lemon bars?!


Lemon Deluxe Bars


Ingredients

Crust:
2 C sifted flour
1/2 C sifted powdered sugar
1 C butter (2 cubes), softened

Lemon layer:
4 beaten eggs
2 C granulated sugar
1/2 C lemon juice (from jar)
1/4 C sifted flour (for second half of recipe)
1/2 tsp baking powder

Instructions
1. Preheat oven to 350 degrees
2. Sift together he 2 C flour and the 1/2 C powdered sugar
3. Cut in the butter until mixture clings together
4. Press into greased 9’ x 13’ pan w/ back of spoon
5. Bake for 20-25 min, or until lightly browned
6. Beat together eggs, sugar and lemon juice
7. Sift the 1/4 C flour and baking powder; stir into egg mixture
8. Pour over baked crust and bake 25 minutes longer
9. Sprinkle with desired amount of additional powdered sugar
10. Allow to cool for several hours before cutting/serving


enjoy your time in the kitchen...

Wednesday, April 14, 2010

RECIPE: Chilaquiles Verdes


According to Wikipedia... Chilaquiles is a popular breakfast south of the border. And since I love all foods latin and all foods breakfast this simply sounds A-M-A-Z-I-N-G !!! And although I've never eaten this before no better time to "make it my own".

Other than the tomatillos and the serrano pepper... most of these ingredients were already in the pantry.


First let's take a look at tomatillos. This was my first time using them... and I've learned quite a bit about them today! They are considered a fruit. They grown on vines similar to tomatoes. And they range in size from cherry tomatoes to small vine tomatoes. They aren't as juicy inside as tomatoes... a bit more dense.


This is what they look like, in 3 stages. 1) The tomatillo still in it's "paper wrapper", 2) A tomatillo partially unwrapped and lastly 3) A tomatillo completely stipped of it's protective cover.


The "paper wrapper" (aka protective cover) peels away very easily. And underneath you find this beautiful jewel.


The paper wrapper is attached at the stem. Peel up towards the stem and snap off... it's that easy. Once stripped of it's wrapper you'll feel a slight sticky texture on the outside of the tomatillo. This can be rinsed off with a slight rub under some lukewarm water.

And now off we go to make the salsa verde... gather your ingredients.

Quick note on the serrano pepper: In the picture below you can see that I split the pepper and removed the seeds/ribs from one half of the pepper. I can sometimes be kind of a wuss when it comes to heat, and since there's no real way to know how hot a pepper is I erred on the side of caution. If you like more heat, you can certainly leave the seeds/ribs in place. (Confession: I would leave them in there next time. It wasn't very hot at all.)


I think it's a good idea to cut the tomatillos in half... this helps to ensure they are fresh. (Practical example to this comes later in this post. Riveting, eh?!)


A quick slice through all of the tomatillos... and EWWW!! What's that?! That's a bad tomatillo. Let's toss that one. It's not going to do anyone any good at this point...


Everyone in the pot!


Top off with enough water to just barely come to the top of the veggies... and bring to a boil...


Oh! And I forgot about the green onions... I dice up two to throw in the pot. And set aside the 3rd one for garnish at the end.


Now watch closely! The color of green changes rapidly as the vegetables boil down...


And voila! See how quickly that happened? Let it boil down for several minutes, until the veggies are soft. And then remove from the heat to cool slightly.


I pulled out the immersion blender (that I bought at the thrift store!!!) and whirred those little green jewels into submission.


And don't forget about the important spices!

So at this point the salsa is almost done... but it's still a little watery. So we're going to put it in a saute pan with a little oil (so things don't stick and burn) and then let it reduce slightly. By allowing the salsa to tenderly bubble on the stove the extra moisture evaporates and thickens our salsa. And you want a thick salsa. Let this sit for about 20 minutes, stirring regularly.


While all of that's going in I'm going to start the plating process. Now, to all of the authentic latin cooks out there... I completely acknowledge the fact that this isn't truly authentic. But it IS what works for our preferences and tastes.

On a large cookie sheet I am going create a base for our dinner. This is chips (piled in a circular shape) and topped with cheese. Then I slid it under the broiler and waited for the cheese to melt.

So, now I'm doing two things at the same time... and hold on, 'cuz we're moving to doing 3 things at the same time. Ready or not, here we go!


It's time to do the scrambled eggs. This is the quick and easy part. Warm up some butter... toss in the beaten eggs, stir around for about a minute on medium heat... and then remove from the heat. That's all they need... I promise.


By now the broiler has done it's job and we can move to the next step.


Let the plating begin...


Transfer your chip/cheese layer to your plate. Top with a few more chips. Add the scrambled eggs.


Ladle on your desired amount of salsa verde, top with cheese. Garnish with green onions, cilantro and sour cream! And dig in!


Some variations include diced/shredded chicken (which is what we tried tonight). And I would rethink that for next time. In fact, I would also use slightly less salsa verde (everything got a litle too runny for my tastes) and not use the chicken next time. But wow was this great!

And for a test run... not bad, if I say so myself!


Chilaquiles Verdes
Recipe by Lori Tisdale

Ingredients

Salsa Verde
8 medium tomatillos (about 1 pound), husked, rinsed , halved
1 serrano pepper, stemmed and halved
1/4 white onion
2 green onions, diced
3 garlic cloves
2 – 2 ½ cups water
Pinch of dried oregano
Pinch of dried thyme
Pinch of cumin
1/4 teaspoon salt
Splash of chicken broth
1 tablespoon canola oil

Corn tortilla chips
1 cup shredded Monterey jack cheese
4 eggs, beaten
2 tablespoons crumbled queso fresco or enchilado cheese
1 green onion, diced
1 tablespoon finely chopped fresh cilantro
2 tablespoons sour cream

Instructions
Salsa verde: Place tomatillos, serrano pepper, onion, and garlic in a medium pot and add water to almost cover vegetables. Bring to a boil over high heat. Reduce the heat to medium to medium-low and simmer until the vegetables are soft and the tomatillos turn pale green, 8-10 minutes. Remove from the heat and let cool slightly.

With an immersion blender (or in a blender) puree for a about a minute to blend until all chunks disappear. Add the oregano, thyme, cumin, salt, and broth. Continue to puree until smooth. You should have several cups of salsa verde.

In a large/deep sauté pan over medium-high heat, coat with the canola oil. Once the oil ripples, pour in the salsa verde (be careful to not be splattered with hot oil or salsa). Once it comes to a boil, reduce the heat to medium and simmer, stirring regularly, until the sauce is slightly thickened, 15 to 20 minutes.

Under the broiler, slide tortilla chips topped with Monterey jack cheese and allow to melt. While under broiler, scramble the eggs and remove from heat.

Plating: To finish the chilaquiles, transfer chips/cheese onto plate. Top with ¼ cup salsa verde, then eggs, then another spoonful of salsa verde. Sprinkle with the queso fresco, green onion and cilantro. Garnish with sour cream, serve immediately.


enjoy your time in the kitchen...

LinkWithin

Related Posts with Thumbnails