Sunday, May 29, 2011

RECIPE: Tangy & Sweet Fruit Dip


This is THE perfect dip for a large fruit platter. Being strawberry season and all ... it's the perfect time to post this.


Here's what I do for fruit dip... a cup of sour cream and 1 1/2 cups powdered sugar. Whisk it into submission (aka "until all powdered sugar is dissolved") and give it a taste. If you like it sweeter add another 1/2 cup powdered sugar.


The sour cream makes it tangy. The powdered sugar sweetens it up... and it's just heavenly. It's like the perfect combination!


So, so, soooo good! You can also add a drop of vanilla extract or lemon zest, etc. Top it with a pinched off mint blossom... OR just dunk a strawberry in it and enjoy it as is...

This dip is also great served over blackberries or blueberries, to dip pineapple in, etc...


Sure there are healthier options than sour cream and powdered sugar... so have at it (like yogurt and honey)...

Get creative. Be your own chef. But promise me one thing: eat your fruit! It's good for you...


(Yes, I double dipped... don't judge me. It's my own kitchen and I rule here!)

(smile)


enjoy your time in the kitchen...

well THAT didn't work ...

I woke up in the middle of the night (some of my best ideas happen either in the shower or with a startled wake up): "Ooooh! I'll make some cinnamon rolls in the morning!"

I've never made cinnamon rolls before. My mom used to all the time. And I know it took her a long time. And there was a lot of waiting involved. But I was prepared.


So I tackled it: I lined up all the ingredients and started snapping pictures... and by the time I got to the mixing stage I knew something was wrong. The flour and the wet mixture didn't really come together. The dough was just dry... and then I had to add more water to get the dough to look like what I thought it should look like.

But at a certain moment in time I knew these weren't going to come out like I had hoped. But I kept at it...

I followed all the rest of the steps: allow the dough to rest, divide in half, roll out, layer with butter, sprinkle with cinnamon/brown sugar (and half of them with raisins, for me)... placed them in a baking container and set them aside to rest some more.


Below is a picture of the rolls BEFORE rising.


However, as you'll see below, 2 1/2 hours later they still hadn't hardly risen at all.


They weren't possibly going to rise anymore after that amount of time... so I took my chances and baked them.

And then I started bargaining with myself: "Maybe I could suggest they are 'mini-cinnamon rolls'?" But when I pulled them out of the oven I noticed the outsides of the rolls were all flaky and cracking and looked dried out...

I drizzled them with frosting... and took a bite...


And then I changed my mind: "Maybe I should face reality and just call them petrified cinnamon rolls'?"

Sad, sad day ...


And to top it off, my hubby walked into the living room a few minutes later and sheepishly confessed: "Sorry honey. Don't take it personally, but I only ate two of them. My teeth hurt."


No matter the failure, I will try it again. I will start by buying some new yeast. And I'll take it from there...


Anyone else have any failed kitchen projects that you won't let get the better of you?! I want to hear about them!


enjoy your time in the kitchen...

Sunday, May 22, 2011

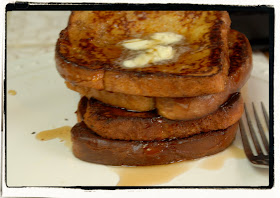
RECIPE: the BEST French Toast EVER, thank you to Alton Brown


First off, I apologize about a few blurry moments in this post... so now that you know, well you can forgive me whole-heartedly... and just keep reading.

Alton Brown swears this is the only way to make french toast correctly. And my hero-of-a-hubby would completely agree... somehow Alton Brown found the perfect combination of ingredients and cooking techniques to make an outstanding french toast. You want to make this... soon!


Following Alton's recommendation, I started by letting the bread sit out over night. It's amazing what a little bit of oxygen will do to some white bread. The bread dries out and it then becomes the perfect canvas for some amazingness.


What else you'll need: eggs, honey and half + half.


Whisk it all together until it looks pretty and custard-like...


Transfer the custard to a casserole pan and set aside...

Then you can start the process of soaking the bread in the custard, about 30 seconds on each side...


Transfer the soaked bread to cooling rack, with a cookie sheet underneath it (to catch any drips). Continue on in batches, two pieces of bread at a time. Soak and drip, soak and drip.


In the meantime you can cook two pieces of bread in a saute pan with a little bit of butter, 2-3 minutes on each side (until lightly browned).


And while you're cooking go ahead and soak up the next couple pieces of bread...


Once the first step of the cooking process is complete, transfer the french toast to another baking sheet or place directly on an oven rack. At this point they need to cook for another 5 minutes or so...


The second part of this cooking process ensures crisp edges, but tender centers. And the french toast is rich, but not heavy.


Confession time: each of these slices of french toast are layered with butter and maple syrup. Don't judge me... just do me a favor: splurge on this! (You know you want to.)


And be prepared for your loved ones to hug and kiss you and beg for you to make more.


Serve up with your favorite brunch or breakfast items ...

But most importantly a huge shout out to Alton Brown ... thank you for making me look good!


French Toast
Recipe courtesy Alton Brown

Ingredients
1 cup half and half
3 large eggs
2 tablespoons honey, warmed in microwave for 20 seconds
¼ teaspoon salt
8 (1/2 inch) slices day-old bread or stale country loaf, brioche or challah bread
4 tablespoons butter

Instructions
In medium size mixing bowl, whisk together the half and half, eggs, honey and salt. You may do this the night before. When ready to cook, pour custard mixture into a pie pan and set aside.

Preheat oven to 375 degrees F. Dip bread into mixture, allow to soak for 30 seconds on each side, and then remove to a cooling rack that is sitting in sheet pan, and allow to sit for 1 to 2 minutes.

Over medium-low heat, melt 1 tablespoon butter in a 10-inch nonstick sauté pan. Place 2 slices of bread at a time into the pan and cook until golden brown, approximately 2 to 3 minutes per side. Remove from pan and place on rack in oven for 5 minutes. Repeat with all 8 slices. Serve immediately with maple syrup, whipped cream or fruit.


enjoy your time in the kitchen...

Sunday, May 8, 2011

2 RECIPES: Alfredo Sauce and Italian Nachos

Please forgive me, for I neglected to take pictures of all the players for this post... but you can catch up easily. Come with me...

We're going to make italian nachos... and for that we need some grilled chicken, alfredo sauce and nacho toppings. You will want to make these...

My hero-of-a-hubby and I first enjoyed these in Dallas at a Johnny Carino's restaurant... and we fell in love, with the nachos that is (as we were already in love with each other - obviously). We were in Dallas for my brother's wedding... and jealous they had a Carino's and we didn't.

Lucky us, they eventually opened a Carino's restaurant near us in Southern California and we got to go back and enjoy it again and again... to the point that I finally started making them at home. Sadly they recently closed their location near us... but we don't mind, I'm making my twist on our favorite Carino dishes in my own kitchen now...


Here's how we do the italian nachos. Start with wonton wrappers, cut in half to form triangles. (I used about half a package, or 30-40 wonton wrappers for two large dinner plates of nachos.)


Once the canola oil is heated up to frying temperatures then you can start frying the wonton wrappers, several at a time. Fry until lightly browned and then flip them over. With a spider remove them to a dish lined with paper towels (to soak up any extra oil). Continue with all of the wonton wrappers until they are all fried.


While you're working on the wonton wrappers grill up some chicken breasts. You'll see that I cut the chicken breasts in half. They cook a bit faster this way... and that suits me just fine.


Once they were on the grill I sprinkled them with garlic salt and black pepper. They cooked for about 3 minutes on each side... once they got flipped over they cooked for about 2 minutes. Nice and fast, eh?!


In the meantime, most of the wonton wrappers are ready... every now and then I sprinkled them with some kosher salt. And then they just sat over here and waited for their nacho destiny.


In the meantime I started the quick and easy alfredo sauce. This uses a block of cream cheese, half a stick of butter, parmesan cheese, milk, nutmeg, and kosher salt/pepper.


It's as easy as this... cube the butter and cream cheese. Place the cubes in a medium sized saucepan (over medium low heat), add milk and parmesan cheese and stir until everything is melted and smooth.


Add the kosher salt, black pepper and freshly grated nutmeg to taste. Allow the sauce to sit over low heat, stirring every few minutes, until you're ready to use it.


Tonight my hero-of-a-hubby was helping with the prep work... see?! There are his manly hands slicing up some cute lil' pepperoncinis... yum!!!

And to give him a bit more credit... he also did 2 loads of dishes tonight (lucky me!), prepped most of the misc ingredients (also known as "mise en place"), manned the frying wonton wrappers, and looked over my shoulder each step of the way! We had fun doing this together tonight! (I'm one lucky girl!!!)


Lastly we begin the assembly... let's work on the first layer of "chips", sliced chicken, alfredo sauce and toppings of choice...


And we finish it off with just one more layer of all of these good things...


He likes only a few pepperoncinis and black olives, and no tomatoes...


But me? Load 'em up! I love the pepperoncinis, black olives, diced tomatoes... and I typically like cripier chips. So we made our own plates...


Johnny Carino's also offered them with crumbled italian sausage, which we did not use tonight... but it only makes these nachos better. There's always next time...


In the meantime... here's the recipe for the alfredo... enjoy!!!


Favorite Alfredo Sauce
Recipe courtesy Lori Tisdale

Ingredients
8 ounces cream cheese, cut into small squares
3/4 cup parmesan cheese, grated
¼ cup butter, cut into small squares
½ cup milk
Pinch of salt, black pepper and nutmeg

Instructions
Place medium saucepan over medium-low heat. Combine cream cheese, Parmesan, butter and milk, stirring constantly until smooth. Add salt, pepper and nutmeg to taste.

Leftovers freeze well.


enjoy your time in the kitchen...

Friday, May 6, 2011

Step 4 to homemade limoncello...

We are one step (and 40 days) away from being able to enjoy this limoncello. This process takes about 3 months from beginning to start... I cannot wait!

To see what the first steps look like, go here: Steps 2 and 3 to homemade limoncello. Within that blog post will be a link to Step 1.


This is today's finished product...


Here is where I picked up... I pulled the two containers of liqueur out of the dark and cool cabinet plus I need coffee filters, a funnel, a ladle, baker's sugar, and distilled water.


Hours before I was ready to tackle this time-involved process I made the simple syrup. I chose "baker's sugar" over granulated sugar simply because it is finer and dissolves quickly. The simple syrup must cool before it can be added to the liqueur.


To make simple syrup you simply add 2 parts sugar and 1 part water to a pot and turn on the heat. Once the sugar is dissolved and the liquid turns clear then it's done. Give it a few stirs throughout this process... it's that easy.


And when you're ready to start the filtration process here is how it goes...


Remove the lemon rinds... they have served their purpose here. Lacking their bright yellow color at this point they still smell like lemon, but the taste has been left behind in the liqueur.


The liqueur now needs to be filtered of the "floaties"... yes, take a close look. It's not pretty... but it will be much prettier later in this post.


Here we go... find a coffee filter, a funner and another container to strain the liquid into. You might be surprised how fast these filters clog with "floaties". So be prepared to switch out the filter with nearly each ladle-full of liquid.


This process is time consuming, but necessary and well worth it.


Once it was time, I simply plopped the used filter into a bowl and placed a new one in the funnel.


Already you can see how much clearer the liquid is...


So let's step back and take a look at the whole process here. And as you'll see I'm filtering two liqueurs. While I'm at it I'm trying my hand at a grapefruit liqueur as well. (YUM!)


Similarly you'll see that the grapefruit rinds have lost of lot of their color in the past 40 days. But they imparted some major flavor to the vodka. Wow...


And THIS is what the last ladle of limoncello looks like before it gets filtered. I'm happy to know it's being filtered out.


Also this is what's left behind in the last filter... blech! I'm glad it's in the filter and not in the prized liqueur.


And here is where I'm going to skip some pics... the liqueur got filtered again. Yes, it got filtered a second time. The second time around the process went a bit faster... yay!


The last step is adding the cooled simple syrup to the liqueur and then adding it back to cook, dark cabinet.


I snuck a sip of the grapefruit liqueur ... and if it's any indication of what this is going to be like in 40 more days... well, holy moly!!! That will be the day!


In the meantime I'm counting the days...


enjoy your time in the kitchen...