Saturday, January 29, 2011

RECIPE: Because-It-Makes-My-Hubby-Happy Hash


My hero-of-a-hubby woke up and informed me he's taking today off of work... WHAT?! We could've gone out last night and danced until the sun came up?! And you didn't tell me?! (HA!!! YEAH RIGHT!!!)


So, I guess we should do breakfast together... hmmm, what to make?! What to make?! Wait - what's in the pantry?!


Between the fridge, freezer and pantry we had the items for this hash... so it all came together quickly. What a nice surprise!!!


And once again, I'm the hero of the household...


My pantry shortcuts for this? They are the farthest from fancy/culinary cuisine... but I still believe in keeping "ready-serve" bacon and freeze-dried hash browns in the pantry. They always seem to come in handy in a pinch... especially this morning! Yay for pantry power!!!


Now he's jamming on his guitar and I'm in day-off heaven! life is good...


Because-It-Makes-My-Hubby-Happy Hash
Recipe courtesy Lori Tisdale

Ingredients
1 tablespoon butter
1 small onion, diced
5 slices bacon, diced
1/4 pound breakfast sausage, cooked/crumbled
5 eggs, slightly beaten
1 cup cheddar cheese
½ cup Monterey Jack cheese
1 ½ - 2 cups shredded hash brown potatoes
1 cup cottage cheese
Pinch kosher salt/red pepper flakes

Instructions
Preheat oven to 375 degrees F. Warm large cast iron skillet over medium heat.

In cast iron skillet, cook bacon and onion in butter. Add pinch of salt to help draw out onion juices. If using already cooked/crumbled sausage, add to mix at end of cooking. Mix well.

In a large mixing bowl, beat eggs. Add cheddar, Monterey jack and cottage cheeses. Stir in hash browns. Add onion/bacon/sausage mixture; mix well. Transfer ingredients back to skillet and place in oven. Bake uncovered for 30-35 minutes, until a knife inserted into the center comes out clean. Allow to cool/stand for 10 minutes before serving.


enjoy your time in the kitchen...

My favorite form of chocolate...

Prepare for your world to be rocked... the recipe calls these "brownies", but I made mine a bit more like cake. Either way - brace yourself!


A shout out to my boss who brought these brownies into work around Christmas time... thanks Marsha!!! So, so, so good! And thank you for sharing the Penzeys catalog you brought back from your road trip! I have appreciated reading about their product line and some of the other recipes they share in their catalog! THIS ONE, though, BY FAR, is my favorite!

The idea of pouring the cocoa frosting over the piping hot cake is stellar... it's like there are 3 layers of goodness to eat your way through: the top layer of cocoa frosting followed by a very moist and rich chocolate cake... but in between those two layers is a melty layer of fudge-like goodness (created by what I can only describe as a "melding" of hot cake and fresh frosting poured on top). Oh wow... this really IS chocolate nirvana!


Favorite Chocolate Brownies
Recipe courtesy Annette Gong, Penzeys Spices Fall 2010 catalog pg 53
Link: http://www.penzeys.com/images/F10.pdf

Ingredients
2 cups flour
2 cups sugar
1 teaspoon baking soda
½ teaspoon salt
1 cup butter (2 sticks)
¼ cup cocoa powder
1 cup water
½ cup buttermilk
2 eggs
2 teaspoon pure vanilla extract

Frosting:
½ cup butter
5 tablespoons cocoa powder
6 tablespoons buttermilk
1 pound powdered sugar (4 ¼ cups)
1 teaspoon pure vanilla extract
½ cup chopped nuts, optional

Instructions
Preheat oven to 350 degrees F. Grease 10x15 rimmed pan or 9x13 pan (for more cake-like brownies) and set aside. Sift together flour, sugar, baking soda and salt. In a medium saucepan, melt the butter. Add the cocoa and water and stir well to combine. When the mixture starts boiling, remove from heat, pour over the dry ingredients and stir. Add the buttermilk, eggs and vanilla. Mix well. Pour into the pan for 18-20 minutes, 25 if baked in a 9x13 pan. (Note from Lori: I made mine in a 9x13 pan and found it needed more like 30 minutes.)

During the last 10 minutes of baking, make the frosting. In the same saucepan you used earlier melt the butter. Add the cocoa and buttermilk and stir. Remove from heat and add powdered sugar and vanilla extract. Beat until smooth. Fold in nuts, if desired. As soon as you remove the brownies from the oven, carefully pour frosting over hot brownies.


Sidenote on making your own buttermilk - have you ever heard of such a thing?! I used to get frustrated buying buttermilk for a specific recipe and only needing 1/2 cup of it (knowing a good portion of it would go to waste). Well, I ran across a way to make my own buttermilk as a substitute for the real stuff.

What you'll need:
- milk (just under one cup)
- 1 tablespoon white vinegar or lemon juice

How to prepare:
1. Place a tablespoon of white vinegar or lemon juice in a liquid measuring cup.
2. Add enough milk to bring the liquid up to the one-cup line.
3. Let stand for five minute. Then, use as much as your recipe calls for.

And it REALLY works! I love these kinds of kitchen tips...


Confession time:
As I prepared this blog entry, on a Saturday morning, I was enjoying a piece with a hot cup of coffee. As the saying goes, life is short - eat dessert first!


enjoy your time in the kitchen...

Friday, January 28, 2011

RECIPE: Quick Turkey Bolognese with Tagliatelle


Bolognese... a style of sauce from the region of Bologna, Italy. Granted, my version isn't all that traditional. There are some shortcuts made and some ingredients substituted... but it's darn tasty!!!

So all you authentic italians out there... don't throw darts. You don't have to like my version. But we do... it's a quick dinner, having substituted ground turkey it's a bit healthier, and it's sure a hit in our household.

So, join me in the kitchen for a quick and uber-tasty dinner!!!


This is where I started... ground turkey, your choice of marinara sauce, red wine, milk, olive oil, diced onions/garlic/mushrooms (mushrooms not pictured), red pepper flakes, salt/pepper and parmesan cheese.


In a heavy bottom pan, here I'm using my favorite Dutch Oven, brown the ground meat in the oil. Once most of the pink is gone add your diced veg (onions, garlic and mushrooms).


Saute over medium-high heat for a few minutes... and then...

Add your vino and marinara...


Give it a good stir... lower the heat and simmer for several minutes. Taste it... if you think it needs it (and we do) add some kosher salt and red pepper flakes, to taste.


Allow it so simmer a little longer and then add the milk and parmesan cheese... once the pasta is al dente add it to the sauce and give 'er a toss!


Call the family to wash their hands and come to the table... dinner's on!!!


From prep to plate, it takes about 30-45 minutes. And most of that is cooking time. What a heart-warming dish... you can serve it by itself, or with a panini or a whole mess of garlic breadsticks (yeah - that's what we did).

Enjoy it... we do!


Quick Turkey Bolognese
Recipe courtesy Lori Tisdale

Ingredients
2 tablespoons olive oil
1 lb ground turkey (or ground hamburger, if you prefer)
3-4 cloves garlic, diced
½ cup diced onion
½ cup diced crimini mushrooms
2 cups of your favorite marinara
1/8 – 1/4 teaspoon red pepper flakes
1 cup red wine
½ cup milk
¼ grated parmesan cheese, plus some
Kosher salt/pepper

Instructions
Brown ground meat in heavy bottom pan; over medium-high heat. Once almost all the pink is gone add diced onions, garlic and mushrooms. Sauté and stir for about 5 minutes, until vegetables have softened. Add wine, marinara and red pepper flakes (to taste); stir well. Bring to a simmer, stirring occasionally. Simmer for about 15 minutes; over medium-low heat. Taste to see if you want to add any salt/pepper. Stir in milk and grated parmesan. Simmer for another 5 minutes or so. In the meantime, prepare tagliatelle noodles according to package. When the pasta is al dente drain transfer to sauce; toss until all pasta is coated with sauce. When plating add another sprinkle of parmesan.


enjoy your time in the kitchen...

Saturday, January 22, 2011

Trader Joe's Chocolate Lava Cakes

Two nights ago my hero-of-a-hubby asked for a favor ... he wanted some chocolate treats in the house. Which means he wanted me to bake his favorite = brownies. But I had a full day on Friday and knew I wouldn't be able to get any baking in...


So I stopped by Trader Joe's. And I found these... Chocolate Lava Cakes!


They are packaged two to a box... already cooked, packaged and then frozen individually.


Remove the packaging, including the cup ... and then you can either cook them in the microwave (one at a time) or bake them together in the oven.


In hindsight though, I think I should have turned the cups over and so the cake was "upside down"... right? Not sure if the packaging instructed me to do so... but I seem to remember seeing them that way... right? Who knows... (admittedly, they won't taste any different)


My Friend Debbie also suggests to cook these about 3 minutes less than the box says... this will ensure that the "lava" flows freely from the center when they are broken into...


And of course she was right... the lava flowed. And my hero-of-a-hubby was happy to have chocolate.


Someday I'll bake these from scratch... but Trader Joe's version was a lifesaver last night!


enjoy your time in the kitchen...

Friday, January 21, 2011

The BEST Chicken Pot Pie I've ever made!!!


Thank you to Cook's Illustrated for this... Chicken Pot Pie with Savory Crumble Topping. Well-written recipe... full of flavor, some serious flavor!!!

For just me and my hubby I cut the recipe in half and it was plenty... but we sure were wanting more! Wow... words CANNOT explain how yummy this was. I guess you're going to have to make it for yourself to find out!


Here's where I started... the" mise en place". I chopped, diced, measured, poured and got all the ingredients ready for the process. (I have an affinity for mise en place... what can I say?! I'm an organized person and this process is just so much fun for me.)

Chicken stock, canola oil, cream, butter, mushrooms, onions, peas, carrots, flour, soy sauce, tomato paste and lemon juice.


I've never used soy sauce, tomato paste or lemon juice in a chicken pot pie. I would consider these to be the "secret weapons" of this dish. THANK YOU to Cook's Illustrated for these secrets! (This idea opens a whole new set of ideas for me... when it comes to other dishes that might need a kick of flavor. Seriously - love it!)

In a Dutch oven I boiled the chicken until cooked...


And while the chicken cooked I worked on the savory crumble topping... which is good enough to just bake up and eat as a Friday afternoon snack! The topping is made of flour, baking powder, salt/pepper, cayenne pepper, butter, parmesan cheese and cream. Watch this...

Mix the dry ingredients together and added cubed/chilled butter... then with your hands (the best tools in the kitchen) rub the butter into the flour until it resembles a coarse cornmeal. Stir in the cheese until well mixed and then add the cream.


Mix it with a spoon and crumble the topping into uneven globs of goodness onto a baking sheet... fun, huh?!
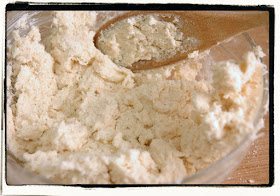


Bake off the topping in a hot oven while you start assembling the rest of your pot pie. (The pot below is the same Dutch oven I boiled the chicken in - no need to wash it. I transferred the chicken to a cutting board so I could chop it up... and I strained the broth and set it aside to use it later in this process.)

From here on it comes together pretty quickly. Saute the carrots, onion, celery in a little bit of veg oil and some salt/pepper, until soft... once done transfer the vegetables to a bowl.

Add a bit more veg oil to the Dutch oven and do the same with the mushrooms...


They will lose their moisture in about 5 minutes... then add the tomate paste and soy sauce and cook just a tad (until the moisture evaporates).

About now it will be time to remove the crumble topping from the oven... try not to snack on all of it... there IS another purpose for it!


Back to the Dutch oven... this is what has been left behind by the mushrooms, soy sauce and tomato paste process. That "brown stuff" on the bottom of the pan is pure gold in this dish!!! It's called FOND... and I'm very fond of fond. (My apologies... that was super cheesy!)

When you add moisture to fond it comes off the bottom of the Dutch oven nicely and imparts some amazing flavor to your dish.

As you can see I've removed the mushrooms from the Dutch oven. They are now in the bowl with the other vegetables, waiting for their next task.


We will now start building the sauce, starting with butter and flour. Stir the butter and flour together, allowing it to cook for a minute or so... otherwise the sauce will taste "flour-y".

Next pour in the reserved chicken stock and milk (or cream) and while stirring scrape the fond off the bottom and sides of the Dutch oven.


In the picture below, see the wall of the Dutch oven? And how easily that fond scrapes off? It will then just melt into the sauce mixture and that's where a lot of the amazing flavor of this dish comes from. Thank you Mr Fond! Give the sauce a little taste. If it needs a little more salt/pepper add it now.


Remove the Dutch oven from the heat and add the lemon juice, shredded chicken and vegetables (including frozen peas)...


Stir together a few times and transfer mixture to baking dish... since it's just the two of us I used a small round casserole (but the recipe from Cook's Illustrated calls for a 9" x 13" baking dish). Then add the crumble topping and place it on the middle rack in the oven.


About 15-20 mins later you TOO will be saying this is the best chicken pot pie you've ever made!!! You can do it... and you're loved ones will thank you for it!!!

A few tips from Lori:

- Always read through a new recipe completely before making it the first time. I've made this mistake so many times and am still learning it. So take it from me.... read it first, then get to it!

- Even if you don't like to, go through the mise en place process for this dish. Have all of your ingredients pre-measured, set aside and waiting for you to grab them. Just trust me...

But most importantly... ...


enjoy your time in the kitchen...